Best Gear
Best Hydrometers for Home Brewing
For most home brewers, the SOLIGT Triple Scale Hydrometer with Glass Test Jar at $18.98 is the best all-around choice because it reads specific gravity, Brix, and potential alcohol in one glass tube and ships with the test jar you need to use it.
Brewers who want to track gravity without opening the fermenter should look at the Tilt Black wireless hydrometer at $135.00 instead, which logs readings to a phone continuously through the vessel wall.
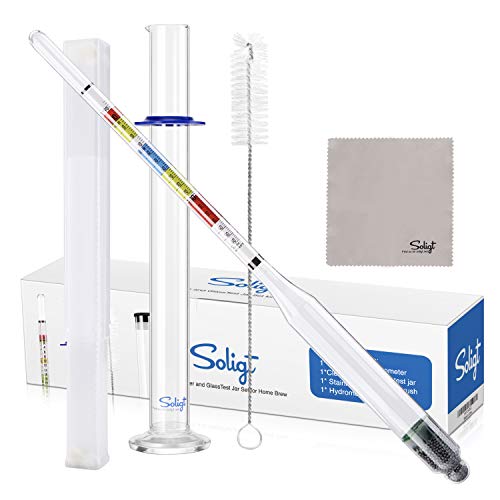
SOLIGT Triple Scale Hydrometer with Glass Test Jar
SOLIGT
It reads three scales at once, ships with its own glass test jar so there is nothing extra to buy, and costs under twenty dollars, which covers everything a hydrometer needs to do.
Price last checked at publication and changes often.
The one job a hydrometer actually has to do
A hydrometer measures the density of a liquid relative to water, and in brewing that density comes almost entirely from dissolved sugar early on and from a mix of unfermented sugar and alcohol later. Every hydrometer on this list does that one job. The differences between them are scale layout, glass thickness, whether a test jar is included, and whether the reading gets sent to a phone instead of read by eye.
None of that changes what the reading means. A specific gravity of 1.050 before fermentation and 1.010 after tells you exactly how much sugar converted, provided the sample is at the temperature the hydrometer was calibrated for. Most home brewing hydrometers are calibrated at 60 degrees Fahrenheit, and a reading taken from a warm sample reads lower than the true gravity. This site's hydrometer correction calculator handles that adjustment properly, since the correction is not a flat number across the whole temperature range.
Why a hydrometer is the only real proof fermentation is finished
Airlock activity slowing down is not proof of anything. Krausen falling is not proof of anything. The only real proof that fermentation has finished is a hydrometer reading that holds steady across several days in a row. If the gravity drops from one day to the next, fermentation is still working, even if the airlock has gone quiet.
This matters because bottling too early is exactly what causes a sealed bottle to build enough pressure to fail. A yeast strain's published attenuation range describes what it typically does under normal conditions, not what it did in your fermenter with your wort and your temperature. Treat attenuation numbers as a planning tool, not a stopping point, and confirm the actual result with two hydrometer readings taken a few days apart before you prime and bottle.
- Take the first reading once airlock activity has clearly slowed.
- Take a second reading three to four days later from a fresh sample.
- Bottle only once both readings match.
Reading the scales: SG, Brix, and potential alcohol
Most home brewing hydrometers print three scales on the same paper insert: specific gravity, degrees Brix, and potential alcohol. Specific gravity is the one every brewing formula and every calculator on this site expects. Brix reads on the same principle as a refractometer, so a hydrometer's Brix scale is useful mainly for cross-checking a refractometer, not as a primary number. Potential alcohol is a rough finishing estimate built into the scale and is worth ignoring in favor of running the actual starting and finishing gravity through an ABV calculator.
A triple scale hydrometer like the SOLIGT or the Fermtech costs nothing extra over a single scale model, so there is little reason to buy a single scale unit today.
Glass hydrometers versus a wireless logger
A glass hydrometer floating in a sanitized test jar is still the cheapest, most reliable way to get a gravity reading, and it has no batteries, no app, and nothing to pair. Its one real limitation is that every reading means opening the fermenter and pulling a sample, which is a small oxidation and infection risk each time.
A wireless logger like the Tilt sits inside the fermenter for the entire batch and reports gravity and temperature to a phone without ever opening the lid. That convenience is real for anyone fermenting under pressure, in a narrow conical, or simply brewing often enough that constant sampling gets tedious. It also costs six to nine times as much as a glass hydrometer and adds a battery and a wireless connection to something that used to be entirely mechanical.
Someone who brews two or three batches a year in a bucket with a simple airlock gets little from a Tilt that a fifteen dollar glass hydrometer and test jar do not already provide. A hydrometer bought once at the start of the hobby typically lasts for years of batches, provided the glass is handled carefully and never dropped, which makes even the higher end of this list a reasonable one-time purchase rather than something to rebuy every season.
Test jars break more often than hydrometers do, since they are the piece that gets set down on a hard counter. A standalone jar like the Fermentaholics test jar, or the Brewing America jar that includes a cleaning brush, is sold separately for exactly this reason, and either works with any glass hydrometer on this list.
Calibrating a hydrometer before you trust it
Every hydrometer can be checked against a known reference before relying on it for a real batch. Distilled water has a specific gravity of exactly 1.000 at the temperature a hydrometer is calibrated for, so floating a hydrometer in distilled water at that reference temperature and checking that it reads 1.000 is a simple way to confirm it has not shifted from manufacturing variance or shipping damage.
A hydrometer that reads noticeably off from 1.000 in a distilled water check at the correct temperature is either defective or was calibrated at a different reference temperature than assumed. Check the printed calibration temperature on the hydrometer's paper insert before assuming a problem, since not every hydrometer uses 60 degrees Fahrenheit as its reference point.
Common mistakes when reading a hydrometer
The reading should be taken at eye level with the sample, looking straight across at the liquid surface rather than down at an angle, which introduces parallax error and a reading that is consistently off in one direction. The correct point to read is the bottom of the meniscus, the slight curve the liquid forms where it touches the hydrometer's stem, not the higher ring where the liquid climbs the glass.
Trapped bubbles clinging to the hydrometer's bulb are another common source of a wrong reading, since they add buoyancy the hydrometer was not designed to account for. Giving the hydrometer a gentle spin after lowering it into the sample dislodges most bubbles before taking the reading.
- Read at eye level, not from above.
- Read the bottom of the meniscus, not the top ring.
- Spin the hydrometer gently to clear bubbles before reading.
Pulling a sample the right way, and never putting it back
Draw the sample straight from the fermenter through a sanitized wine thief or auto-siphon into the sanitized test jar, filling it enough that the hydrometer floats freely without touching the bottom or sides of the jar. Lower the hydrometer in with a gentle spin rather than dropping it, which both clears clinging bubbles off the bulb and settles it into the liquid without splashing.
Once a sample has been pulled and handled outside the fermenter, it has been exposed to open air and whatever is on the thief, the jar, and your hands, so it never goes back into the fermenter afterward, no matter how little was used or how careful the process felt. Treat every pulled sample as gone for good, and pour it out once the reading is taken rather than tipping it back in to save volume.
How we chose
These picks come from published manufacturer specifications, including glass tolerances, scale ranges, and calibration temperatures, and from verified owner reviews on accuracy and durability. This is not the result of personal hands-on testing of these specific units. Where owner reviews consistently flagged a design as fragile or a scale as hard to read, that was treated as real signal even without a physical unit in hand.
How the options compare
| Product | Scales | Test jar included | Price | Best for |
|---|---|---|---|---|
| SOLIGT Triple Scale Hydrometer | SG, Brix, potential alcohol | Yes | $18.98 | Most home brewers |
| Fermtech Glass Triple Scale Kit | SG, Brix, potential alcohol | Yes | $14.99 | Lowest cost entry |
| Brewer's Elite Hydrometer and Test Jar | SG, Brix, potential alcohol | Yes | $21.99 | Sturdier glass, easier grip jar |
| Tilt Black Wireless Hydrometer | SG and temperature, logged | No (fits standard fermenter) | $135.00 | Brewers who do not want to open the fermenter |
| Tilt Pro Mini | SG and temperature, logged | No | $175.00 | Narrow-neck vessels and conicals |
The three tiers
These are three genuinely different builds, not the same product at three prices. Buy the tier that matches how much you already know you will use it.
Fermtech Glass Triple Scale Hydrometer Kit
Fermtech
The cheapest complete kit on this list at $14.99, it includes a triple scale hydrometer and a test jar, which is everything a first batch needs and nothing to grow into over time.
$14.99
View on AmazonBrewer's Elite Hydrometer and Test Jar
Brewer's Elite
At $21.99 it adds sturdier glass and a wider test jar that is easier to read at eye level, a real upgrade for someone bottling multiple batches a year without spending much more.
$21.99
View on AmazonTilt Wireless Hydrometer and Thermometer
Tilt
At $135.00 it logs specific gravity and temperature to a phone for the entire fermentation without opening the vessel, which pays off for frequent brewers and pressure fermenters. Anyone brewing a handful of batches a year, or on a tight budget, should stay with a glass hydrometer instead; the Tilt adds a battery and a wireless connection to a job a fifteen dollar tool already does completely.
$135.00
View on AmazonEverything else worth considering

Tilt Pro Mini Wireless Hydrometer
The higher resolution Tilt, sized to fit smaller fermenter openings.

Fermentaholics Hydrometer Test Jar
Measuring cylinder for taking a gravity sample without dropping the hydrometer into the fermenter.

Brewing America Glass Hydrometer Test Jar with Brush
Narrow glass flask and cleaning brush, which reads more accurately than a wide vessel.
Before you do this
A hydrometer reading that has held steady for several days in a row is the only real check that fermentation is actually finished. Bottling before that point, or without correct priming sugar amounts, is how a sealed bottle builds enough pressure to fail.
Related on BrewGearCalc
- Hydrometer correction calculator
- ABV calculator
- Best refractometers
- Refractometer correction calculator
- Brewing guides
Frequently asked questions
- How do I know when my beer has finished fermenting?
- Airlock activity is not proof. Take a hydrometer reading once bubbling has clearly slowed, then take a second reading three to four days later from a fresh sample. If the two readings match, fermentation is done. If the second reading is lower, it is still working and needs more time. This is the only reliable check, since a yeast strain's published attenuation range only describes typical behavior, not what happened in your specific batch.
- Why does my hydrometer reading change with temperature?
- A hydrometer is calibrated to read correctly at one specific temperature, commonly 60 degrees Fahrenheit. A warm sample is less dense than a cold one, so a reading taken from warm wort or beer reads lower than the true gravity. The correction is not a flat number across the whole range, so run the actual sample temperature through a hydrometer correction calculator rather than estimating, especially for a reading used for an ABV calculation.
- What is the difference between the SG, Brix, and potential alcohol scales?
- Specific gravity compares the liquid's density to water and is the scale every brewing formula expects. Brix measures dissolved solids by the same principle a refractometer uses, so it is mainly useful for comparing against a refractometer reading. Potential alcohol is a rough built-in estimate of finishing strength and is less accurate than calculating ABV from an actual starting and finishing specific gravity reading.
- Is a Tilt or other wireless hydrometer worth the extra cost?
- It depends on how often you sample gravity. A wireless logger sits inside the fermenter for the whole batch and reports gravity and temperature without opening the lid, which matters for pressure fermenters and for brewers who ferment often. It costs six to nine times more than a glass hydrometer and test jar, and someone brewing a few batches a year gets little practical benefit from that convenience.
- Can a hydrometer break, and what happens if it does?
- Yes, both the hydrometer and its glass test jar are thin glass and can chip or crack, most often from being set down hard on a counter or bumped against a fermenter's rim. A cracked test jar is cheap and simple to replace on its own, since any standard glass hydrometer fits any standard test jar. Handle both by the stem, sanitize before use, and store them somewhere they will not get knocked over.
- Do I need to sanitize my hydrometer before every use?
- Yes. A hydrometer and its test jar touch the beer sample directly, so both need the same sanitizing routine as any other equipment that contacts wort or beer after the boil. A quick dip in a no-rinse sanitizer solution before use is enough. Skipping this step risks introducing contamination through a tool that gets used repeatedly across the same batch, right when the beer is most vulnerable to infection.
Researched from published brewing formulas, manufacturer specifications and verified owner reviews. This is general guidance, not professional advice.