Guides
Kegging for Beginners
A beginner kegging setup centers on a 5-gallon ball lock or pin lock corny keg, a CO2 regulator, and a 5-pound aluminum CO2 tank, the standard size sold for home use.
A conversion kit adapts a chest freezer or fridge into a kegging setup for less money than a dedicated kegerator, though it takes more assembly work up front.
Why brewers move from bottles to kegs
Kegging trades the labor of bottling day, filling and capping dozens of individual bottles, for a single racking into one vessel, at the cost of needing a CO2 system and somewhere cold to store and dispense the keg from. For anyone bottling several times a month, that trade pays back quickly in time saved, even though the upfront equipment cost is higher than a case of bottles and a capper.
Kegged beer also carbonates on a much shorter, more controllable timeline than bottle conditioning, since force carbonating with a CO2 tank does not depend on a small population of yeast slowly fermenting out a priming dose. That control is a real practical advantage, not just a convenience.
Ball lock versus pin lock kegs
Corny kegs come in two connector styles, ball lock and pin lock, and the two are not interchangeable without an adapter, since the gas and liquid posts on each style use a different fitting. Ball lock kegs are more common in current home-brewing supply, with more accessories and fittings made for that format, while pin lock kegs, more common on older commercial equipment, remain a perfectly usable, sometimes cheaper option if a used batch turns up locally.
Whichever style is chosen, it is worth standardizing on one connector type across every keg in a setup, since mixing pin lock and ball lock kegs means keeping two sets of gas and liquid fittings on hand and matching the right ones to the right keg every time.
The core components
A basic kegging setup needs a keg to hold the beer, a CO2 tank to supply gas, a regulator to step that tank pressure down to a safe, adjustable serving pressure, gas and liquid lines to connect everything, and a way to keep the keg cold, either a dedicated kegerator or a converted chest freezer or fridge.
| Component | What it does | Example tier |
|---|---|---|
| Corny keg (5 gallon, ball lock or pin lock) | Holds and dispenses the finished beer under pressure | Beginner: Hilangsan or MRbrew 5-gallon keg |
| CO2 tank (commonly 5 lb aluminum) | Supplies the gas that carbonates and pushes beer to the faucet | Beginner: Victory or VEVOR 5 lb CO2 tank |
| CO2 regulator | Steps tank pressure down to a safe, adjustable serving pressure | Beginner: Ferroday dual gauge regulator |
| Conversion kit or dedicated kegerator | Adapts a chest freezer or fridge, or houses everything in one built unit | Beginner: VEVOR or BACOENG conversion kit |
| Beer line and faucet | Carries beer from keg to glass and controls the pour | Beginner: 5 ft ball lock beer line with a standard faucet |
Conversion kit versus a dedicated kegerator
A tower conversion kit adds a faucet, shank and the necessary gas and liquid fittings to a chest freezer or an old fridge, turning it into a functional kegerator for meaningfully less money than buying a purpose-built unit. It takes more assembly, including drilling a hole for the tower on some setups, and it uses whatever freezer or fridge is on hand rather than a compact unit designed specifically for keg storage.
A dedicated kegerator arrives built for the job, sized to hold one or more kegs with the tower, faucet and often the CO2 tank space already accounted for, at a higher upfront price than a bare conversion kit. For someone without a spare chest freezer already sitting around, the price gap between the two options often narrows once a decent used freezer gets added to the conversion kit cost.
Setting a regulator and understanding pressure
A CO2 regulator has two gauges: one showing the tank's remaining pressure, which stays high until the tank is nearly empty, and one showing the working pressure actually being delivered to the keg, which is the number that gets adjusted. Serving pressure needs to be set based on both the beer's target carbonation level and the temperature it is stored at, since pressure and temperature together determine how much CO2 the beer actually absorbs and holds.
Rather than guessing at a pressure setting, a keg carbonation calculator that takes your target carbonation level and storage temperature is the reliable way to land on the right number, since the relationship between pressure, temperature and dissolved CO2 does not reduce to one flat setting that works for every keg and every fridge.
Cleaning a keg before its first use
A used corny keg, especially one bought secondhand, should be fully disassembled, including the poppets, dip tubes and gaskets, and cleaned with a caustic cleaner like PBW before its first use, since residue from a previous owner's beer or an unknown storage history is not something worth guessing about. PBW and similar alkaline cleaners burn skin and eyes on contact, so gloves and eye protection are worth the few seconds it takes to put them on, and PBW should never be mixed with an acid-based sanitizer like Star San in the same container.
After cleaning, sanitize the keg the same way any other vessel touching finished beer gets sanitized, then purge the headspace with CO2 before or immediately after filling, since a headspace full of ordinary air invites oxidation that a CO2-purged keg avoids.
Filling, sealing and checking for leaks
Fill the keg by racking beer in through the liquid post using a jumper line, or through the open lid, then seal the lid and pressurize the keg immediately to check for leaks before it goes into the fridge. A soapy water solution brushed or sprayed on every connection point, the lid gasket, the poppets and the fittings, will bubble visibly at any point that is leaking, which is a fast way to catch a bad seal before a keg sits for days slowly losing pressure.
A lid gasket that has hardened or cracked from age is one of the more common sources of a slow leak on an older or secondhand keg, and replacing it is inexpensive compared with troubleshooting a keg that never seems to hold pressure properly.
The full first-time sequence in order
For a completely new setup, the practical order is: disassemble and deep clean every keg with a caustic cleaner, reassemble with fresh or newly cleaned gaskets, pressurize each empty keg with CO2 to confirm it holds pressure before any beer goes near it, then sanitize the inside immediately before filling. Racking beer into a keg that has only been cleaned, without a separate sanitizing pass right before filling, skips the step that actually protects the beer from contamination, since cleaning removes soil and residue but does not reliably kill microbes on its own.
Once the beer is in and the lid is sealed, purge the headspace by connecting CO2 briefly at a low pressure and venting the relief valve once or twice before leaving the keg to sit, which pushes out much of the ordinary air trapped above the beer. Skipping that purge step leaves oxygen sitting directly against the beer's surface for as long as the keg exists, which shows up over time as duller, more quickly staled flavor than a properly purged keg develops.
Seating a lid that will not seal
A lid that will not hold pressure almost always comes down to the gasket: it is out of its groove, pinched under the lid on one side, dried out and no longer pliable, or simply dirty enough that debris is breaking the seal at one point around the circle. Removing the lid, wiping both the gasket and the keg's sealing lip clean, checking that the gasket sits fully and evenly in its groove with no twist, and reseating the lid squarely before repressurizing solves the great majority of lid leaks without needing a replacement part.
If a clean, correctly seated gasket still will not hold, the gasket itself has likely hardened past the point of sealing well, which happens naturally with age and repeated pressure cycles, and a replacement gasket is a cheap part relative to the time spent troubleshooting an otherwise fine keg.
A realistic first-week timeline
In the first days after kegging, expect to spend real time on leak-checking and adjustment rather than pouring finished beer immediately, since a brand new setup commonly needs a fitting tightened or a gasket reseated once pressure is actually applied for the first time. Force carbonating from scratch, left at serving pressure without agitation, commonly takes about one to two weeks to fully saturate the beer, a widely repeated home-brewing convention rather than a fixed schedule, so a first pour attempted only a day or two after kegging will often taste undercarbonated even with everything else working correctly.
Treating that first week as a shakedown period, checking connections, confirming the fridge holds a steady temperature, and giving the beer the time it actually needs to carbonate, avoids the common mistake of assuming a flat or leaking first pour means something is fundamentally wrong with the setup.
Everything else worth considering

Hilangsan 5 Gallon Cornelius Keg
Stainless ball lock corny keg at entry pricing.
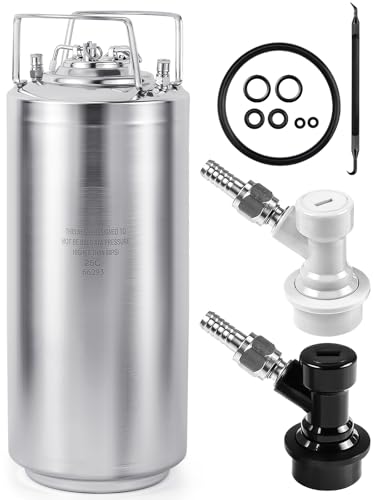
MRbrew 5 Gallon Ball Lock Keg
New stainless cornelius keg sized to hold a standard five gallon batch.

TMCRAFT 5 Gallon Ball Lock Corny Keg
New stainless ball lock keg with dual rubber handles, the standard homebrew serving vessel.

BACOENG Standard Tower Conversion Kit (no tank)
Conversion kit only. It needs a suitable refrigerator and a CO2 tank, neither of which is included.
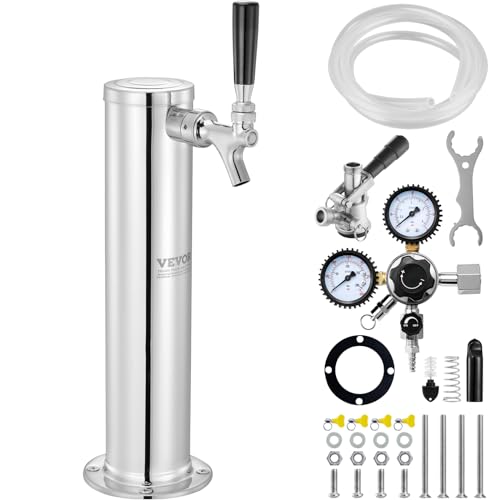
VEVOR Single Tap Kegerator Tower Conversion Kit
Budget single tap tower conversion kit with a dual gauge regulator.

Ferroday Dual Gauge CO2 Regulator (0 to 60 psi)
Dual gauge regulator showing both tank pressure and output pressure, with a CGA-320 fitting.

VEVOR 5 lb Aluminum CO2 Tank (CGA320)
Budget five pound aluminium cylinder with a CGA320 valve.

Victory 5 lb Aluminum CO2 Tank (CGA320)
Five pound aluminium CO2 tank with a CGA320 valve.

Ferroday 5 ft Ball Lock Beer Line with Picnic Tap
Assembled liquid line with a ball lock disconnect and a picnic tap, which is all you need to pour before a tower exists.

Kegco 1 Gallon Pressurized Keg Cleaning Kit
Hand pump pressurised cleaner that pushes no-rinse solution through lines and faucets.
Before you do this
CO2 cylinders are high pressure vessels: secure the tank upright at all times, never modify a valve or regulator yourself, and have tanks filled by a qualified gas supplier. Clean a used keg with a caustic cleaner like PBW before its first use, wearing gloves and eye protection, and never mix PBW with an acid-based sanitizer.
Related on BrewGearCalc
- Keg carbonation calculator
- Keg carbonation reference
- Force carbonating a keg
- How to balance a draft line
- All brewing guides
Frequently asked questions
- Do I need a dedicated kegerator, or can I convert a chest freezer?
- A conversion kit works fine and costs meaningfully less than a dedicated kegerator, adding a faucet, shank and fittings to a chest freezer or old fridge you already have or can find used. It takes more assembly than a purpose-built unit, and you supply the freezer yourself. A dedicated kegerator arrives ready to go, sized specifically for keg storage, at a higher price if you are starting with nothing.
- What size CO2 tank do I need?
- A 5-pound aluminum tank is the standard size sold for home kegging, and it holds enough CO2 for carbonating and dispensing several kegs before it needs a refill, depending on how much is used for force carbonating versus just serving. Larger tanks exist and reduce how often you need a refill, but they take up more space in a kegerator and cost more upfront.
- Should I choose ball lock or pin lock kegs?
- Ball lock is the more common format in current home-brewing supply, with more fittings and accessories designed for it, which makes it the easier default for a new setup with no existing equipment. Pin lock kegs remain perfectly usable and sometimes turn up cheaper secondhand from older commercial equipment. The two connector styles are not interchangeable without an adapter, so it is worth standardizing on one across your kegs.
- How do I know what pressure to set my regulator to?
- Serving pressure depends on both your beer's target carbonation level and the temperature it is stored at, since pressure and temperature together determine how much CO2 the beer holds. Rather than guessing, a keg carbonation calculator that takes your target volumes and storage temperature will return the correct pressure, since there is no single flat setting that works correctly across every fridge and every carbonation target.
- Do I need to clean a keg before using it for the first time?
- Yes, especially a used or secondhand keg. Disassemble it fully, including poppets, dip tubes and gaskets, and clean it with a caustic cleaner like PBW before its first use, since residue or contamination from a previous owner is not something to assume away. PBW burns skin and eyes on contact, so wear gloves and eye protection, and never mix it with an acid-based sanitizer like Star San.
- How do I check a keg for leaks before storing it?
- Pressurize the sealed keg and brush or spray a soapy water solution on every connection point: the lid gasket, the poppets, and the gas and liquid fittings. Any point that is leaking will bubble visibly within a minute or two. A hardened or cracked lid gasket is a common source of slow leaks on older or secondhand kegs, and it is an inexpensive part to replace compared with troubleshooting a keg that will not hold pressure.
Researched from published brewing formulas, manufacturer specifications and verified owner reviews. This is general guidance, not professional advice.