Guides
How to Brew All-Grain Beer
All-grain brewing means mashing crushed grain in water heated to a specific strike temperature, usually between 148 and 158 degrees Fahrenheit, holding it for 60 minutes to convert starch to sugar, then sparging, boiling for 60 minutes, chilling, and pitching yeast, with a full brew day for a 5 gallon batch typically running 5 to 6 hours.
A basic all-grain setup needs a mash tun in addition to the brew kettle, wort chiller, fermenter, and airlock that extract brewing already requires.
What makes a batch "all-grain"
Extract brewing starts from malt sugars a maltster has already extracted at commercial scale, so the brewer dissolves a syrup or powder and moves straight to the boil. All-grain brewing starts one step earlier: you mash crushed raw grain yourself, converting starches to fermentable sugar in your own kettle before you ever get to boil. That extra step is where mash tuns, strike water math, and sparging enter the picture.
The tradeoff is time and equipment against control. All-grain lets you choose every grain in the bill and the exact mash temperature, which shapes body and fermentability directly. It also adds roughly two extra hours to a brew day compared with extract, most of it spent heating strike water and running the mash. See the comparison guide linked below if you are still deciding which path fits your schedule.
Equipment you actually need
A workable all-grain setup is smaller than it looks in catalog photos. You need a mash tun that holds your grain and strike water with headspace to spare, a brew kettle sized for your full pre-boil volume plus a boil-off allowance, and a wort chiller to bring several gallons of near-boiling wort down to pitching temperature in a reasonable window. Everything else, from the fermenter to the airlock, is identical to extract brewing.
- Mash tun: an insulated cooler conversion or a purpose-built vessel with a false bottom or braid
- Brew kettle: at least 7.5 gallons for a 5 gallon finished batch, more for bigger grists
- Wort chiller: immersion or plate, to drop wort to pitching temperature quickly
- Grain mill: optional if your homebrew shop crushes for you, useful if you buy grain in bulk
- Thermometer and hydrometer or refractometer: to hit mash temperature and confirm gravity
Calculating your strike water temperature
This is the one piece of math every all-grain brewer needs before dough-in. The published equation is Tstrike = (0.2 / R) x (T2 minus T1) + T2, where R is the ratio of quarts of water to pounds of grain, T1 is the temperature of the grain itself, and T2 is the mash temperature you are targeting. The 0.2 in the equation is a fixed ratio of the specific heats of grain and water, so this is a STANDARD equation, not a rule of thumb.
Strike water always runs hotter than your mash target because the cool grain pulls the blended temperature down once it is stirred in. At a common ratio of 1.25 quarts per pound, a brewer targeting a 152 degree mash with 70 degree grain would calculate a strike temperature near 165 degrees. Change the ratio, the grain temperature, or the target, and the strike number moves with it. Use the strike water calculator linked below rather than doing this by hand on brew day.
| Grain temp | Target mash temp | Calculated strike temp | Basis |
|---|---|---|---|
| 70°F | 152°F | 165.1°F | STANDARD equation, worked example |
| 60°F | 150°F | 164.4°F | STANDARD equation, worked example |
| 75°F | 156°F | 169.0°F | STANDARD equation, worked example |
Mashing, sparging, and grain absorption
Once strike water and grain are combined, the mash typically rests for 60 minutes. Most starch conversion actually finishes well before that mark, so the full hour is a CONVENTION that gives a margin of safety rather than a hard chemical requirement. After the rest, you separate wort from the grain bed, either by draining and rinsing with additional hot water in stages, called batch sparging, or by slowly rinsing while draining continuously, called fly sparging.
Whichever method you use, the grain itself holds onto some liquid and will not give it all back. A commonly used planning figure is about 0.125 gallons of water absorbed per pound of grain, but this is a CONVENTION, not a fixed constant, and it shifts with how fine the grain is crushed and how long you let it drain. Use the mash water calculator linked below to plan total water volume, and expect to adjust the figure slightly for your own mill and mash tun.
The boil
A 60 minute boil is the default length nearly every recipe assumes, but it is a CONVENTION rather than a published requirement. It persists because it gives predictable hop utilization for bittering additions and a boil-off rate brewers can plan their water volumes around. Shorter or longer boils are possible and common for specific styles, but they shift both bitterness extraction and how much wort evaporates, so treat 60 minutes as a starting point you can adjust once you know your own kettle.
Boil-off rate itself depends on kettle diameter, how hard you boil, and ambient conditions outdoors, so two brewers with the same recipe and different burners can finish with different pre-boil to post-boil volumes. Track your own numbers over a few batches rather than trusting a number from someone else's setup.
Chilling and pitching yeast
Wort sitting hot invites both oxidation and infection risk, so chilling quickly matters. An immersion chiller coiled into the kettle is the simplest option for a 5 gallon batch, while a plate chiller moves wort through a counterflow exchanger and can be faster if plumbed correctly. Either way, the goal is getting wort down to a temperature appropriate for your yeast strain before you pitch, since pitching too warm stresses yeast and can push off-flavors into the finished beer.
Aerating the cooled wort, whether by vigorous shaking, splashing during transfer, or an aeration stone, gives yeast the oxygen it needs during its early growth phase before fermentation turns anaerobic. Pitch a healthy, appropriately sized amount of yeast for your batch size and gravity rather than assuming any single packet works for every recipe.
Efficiency: expect to measure, not assume
Recipe software and kits often assume a mash efficiency somewhere around 72 to 75 percent, meaning the fraction of theoretically available sugar that actually ends up in your kettle. This range is a CONVENTION built from typical homebrew setups, not a number your system is guaranteed to hit. Crush consistency, mash thickness, sparge technique, and even how well your mash tun retains heat all move the real number up or down.
The only way to know your own efficiency is to measure it: take a gravity reading with a hydrometer or refractometer, then compare it against what your grain bill should theoretically produce. Do this for a few batches in a row and you will have a real number for your system instead of a borrowed assumption, which makes every future recipe calculation more accurate.
Cooler conversion versus an all-in-one system
Two common paths get a new brewer to a working mash tun. The first is converting an insulated beverage cooler with a false bottom or a braided manifold, which is inexpensive and holds temperature well because it was built to keep drinks cold, the same insulation works to keep a mash warm. The tradeoff is that a cooler mash tun needs a separate kettle for the boil, and you are managing two vessels and moving hot liquid between them by hand or pump.
The second path is an all-in-one electric system that combines the mash vessel, boil kettle, and often a built-in pump and heating element in a single unit. These cost more upfront but simplify a first brew day considerably, since there is less transferring of hot liquid between separate containers and temperature control is usually built in rather than managed by feel. Neither approach produces better beer on its own, the choice mostly comes down to budget, counter or garage space, and how much manual temperature management you want to do.
Common mistakes on a first all-grain batch
A grain crush that is too coarse leaves starch locked inside the husk and lowers efficiency, while a crush that is too fine can compact the grain bed and cause a stuck sparge, where liquid stops draining freely. Most homebrew shops set their mill to a reasonable middle ground, but if you are milling your own grain, expect to adjust the gap over a batch or two.
Two other issues catch new all-grain brewers more than almost anything else: not accounting for boil-off when calculating pre-boil volume, which leaves a finished batch smaller and stronger than the recipe intended, and losing track of mash temperature because the tun was not preheated before dough-in, which pulls the actual mash temperature below the calculated strike target. Preheating your mash tun with a splash of hot water before adding your calculated strike water, then dumping it out, corrects for the second issue directly.
Everything else worth considering

Brewer's Edge Mash & Boil Series 2 (no pump)
The same programmable all-in-one without the recirculation pump, which is the single cheapest way into all-grain electric brewing.

BrewZilla Gen 3.1.1 (35L)
The previous generation BrewZilla at a lower price, with the same 35 litre stainless body and step mashing.
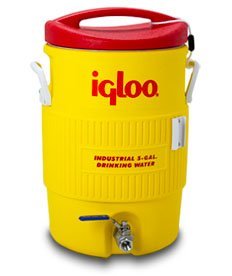
Learn To Brew 10 Gallon Igloo Mash Tun
Insulated cooler mash tun with a stainless false bottom and valve, which holds mash temperature without any power.

Coldbreak 25 Foot Immersion Wort Chiller
Twenty five feet of food grade copper tubing, sized for five gallon batches.

Ferroday 2 Roller Stainless Grain Mill
Two roller stainless malt mill at entry pricing.

CDN Waterproof Digital Thermometer (4.75 inch stem)
NSF certified waterproof thermometer with a long stem, which reaches into a mash without soaking the housing.

Brewer's Elite Hydrometer and Test Jar
Triple scale hydrometer with a plastic test jar. Stable gravity on this instrument is the only real proof fermentation has finished.

Concord Deluxe Banjo Propane Burner (200,000 BTU)
High output banjo burner on a stand, enough to bring ten gallons to a rolling boil outdoors.
Before you do this
If your kettle is heated with a propane burner, run it outdoors only. Propane combustion produces carbon monoxide, and a garage or basement does not ventilate fast enough to keep that safe, even with a door open.
Related on BrewGearCalc
- Strike water calculator
- Mash water calculator
- Efficiency calculator
- Extract vs all-grain brewing
- No-sparge and full volume mashing
- How to build a hop schedule
Frequently asked questions
- How long does an all-grain brew day take?
- Plan on 5 to 6 hours for a 5 gallon batch, start to finish. That includes heating strike water, a 60 minute mash, sparging, a 60 minute boil, chilling, and pitching yeast, plus cleanup. First-time brew days usually run longer since every step takes extra thinking time, and heating water is almost always the part people underestimate most.
- What's the minimum equipment to start all-grain brewing?
- You need a mash tun sized for your grain and water, a brew kettle that holds your full pre-boil volume with room to spare, and a wort chiller. Everything else, the fermenter, airlock, hydrometer, and sanitizer, is the same gear extract brewers already own. Many brewers start with an insulated cooler as a mash tun before upgrading to a purpose-built or all-in-one system.
- Why does my strike water need to be hotter than my mash target?
- Cool grain pulls the blended temperature down once you stir it into your strike water, so the water alone has to start above your mash target to land on it after mixing. The published equation, Tstrike equals 0.2 divided by R times the difference between mash target and grain temperature, plus the mash target, accounts for the ratio of water to grain and how much the grain temperature differs from your goal.
- How much water do I lose to grain absorption?
- A commonly used planning figure is about 0.125 gallons absorbed per pound of grain, but this is a convention rather than a fixed constant. Your actual absorption depends on crush fineness and how long you let the grain bed drain before moving on. Track your own numbers across a few batches and adjust your water calculations to match your specific mill and mash tun.
- What efficiency should I expect from my first all-grain batch?
- Recipe software commonly assumes 72 to 75 percent mash efficiency, but that is a convention built from typical setups, not a guarantee for yours. Your first few batches may land noticeably above or below it depending on crush, mash thickness, and sparge technique. Measure your actual gravity with a hydrometer or refractometer each time so you build a real efficiency number for your own system.
- Do I need a grain mill?
- No. Most homebrew shops will crush grain for you at the point of sale, which is enough for most brewers, especially early on. A mill becomes worthwhile once you are buying grain in bulk, want to control crush fineness for efficiency experiments, or brew often enough that a per-batch milling fee adds up over a year of brewing.
Researched from published brewing formulas, manufacturer specifications and verified owner reviews. This is general guidance, not professional advice.